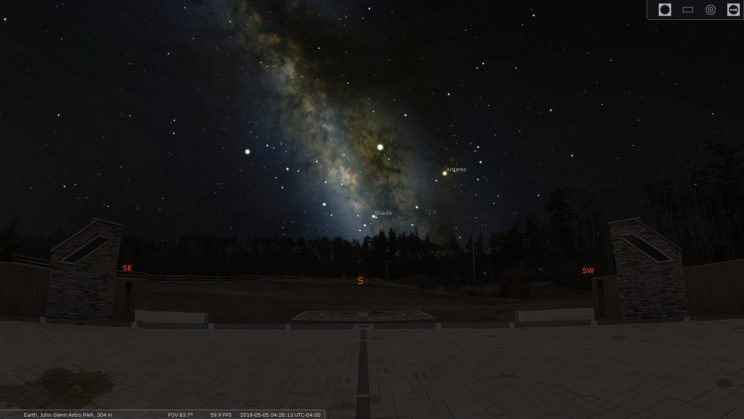
Milky Way season has returned to the northern hemisphere and in a few days, if the weather is clear, we’ll have our first opportunities to photograph the colorful galactic core again. Here in central Ohio, one of the hardest aspects of Milky Way photography is finding a publicly accessible dark sky location. Most of the Hocking Hills region has skies dark enough, Bortle Class 3 to 4, to see and photograph the Milky Way, but finding a clear view of the sky is hard.
John Glenn Astronomy Park
Fortunately, last year, the John Glenn Astronomy Park (https://jgap.info/) opened in Hocking Hills. Located at 20531 OH-664, Logan, OH 43138 JGAP is free and open to the public. There are limited parking spaces available so on Friday and Saturday nights during the peak months of summer you may want to arrive early or make a reservation here: http://registration.jgap.org/
Parking along OH-664, a winding, two-lane, unlit rural road, is just plain stupid. Don’t.
Stellarium
If you’d like to preview the night sky over the park, you can use a free program called Stellarium. It’s available for Windows, Mac, and Linux from https://stellarium.org/ It’s like having a planetarium on your desktop!

You enter a location, date, and time and Stellarium shows you the sky. The program comes with several pre-made, generic landscapes, but also allows users to create their own custom landscapes for specific locations.
FREE Stellarium JGAP Landscape
Last week I stopped into JGAP during the day to take a 360 degree panorama and used that to create a custom Stellarium landscape for the park. Fortunately it was an overcast day so the lighting on the park was flat and even. I’m making the custom JGAP landscape files available to everyone for free. They are released under a Creative Commons Attribution-NonCommercial-NoDerivatives 4.0 International Public License. What does that mean? It’s free, but you can’t change it and you can’t be greedy and try to make money from it.
Right-click this link to download the johnglennastropark.zip Remember where you’ve saved the file, but you don’t need to unzip it.
Installation
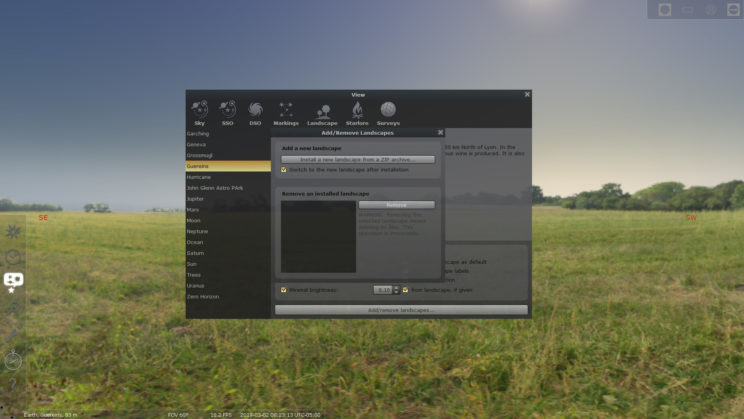
After downloading and installing Stellaium, open it. Move the mouse pointer to the lower left of the screen to make the options menu pop out and click the Sky Viewing and Options button, or hit F4 on your keyboard. In the Sky Viewing and Options box, click the Landscapes tab. Under Options make sure all of the boxes are checked marked except Use this landscape as default then, at the bottom, click the Add/remove landscapes button, in the new popup window make sure Switch to the new landscape after installation is checked then click the Install a new landscape from a ZIP archive button. Navigate to where you saved the johnglennastropark zip file , select the zip file and click Open. The view should now show the park. Before closing the View window, check mark Use this landscape as default if you want Stellarium to always use the park when it opens. You do not need to set the location, it’s built in to the landscape file.

I’ve created two versions of the image file used for the landscape. By default the largest, highest quality 4096px X 2048px image is installed. The graphics cards in some computers may not be able to handle a file that large. If your screen comes up blank after installing the landscape, close Stellarium, download this zip file: johnglennastroparkmedium.zip and go through the steps above to install this medium resolution version making sure to select the medium zip file.
How To Use
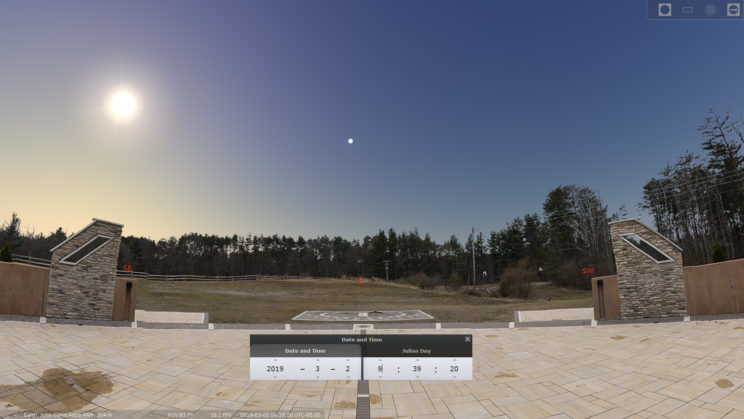
Once you have Stellarium up and running with the John Glenn Astronomy Park landscape, it will show you the sky as it appears at whatever day and time is currently set on your computer. Note: it always shows a clear sky. This is a planetarium program, not a weather app.

By clicking and dragging your mouse you can move the view around 360 degrees. Use the wheel on your mouse to zoom in and out. Near the lower left part of the screen is a number followed by FOV. That stands for field of view, the number of degrees out of 360 the view covers left to right. Humans can see a field of view of about 120 degrees, but most of that is peripheral vision. We only see about 55 to 60 degrees looking straight ahead. Stellarium defaults to a 60 degree FOV. A wide angle camera lens will cover between 75 and 90 degrees. A superwide lens will cover up to about 110 degrees. To see what your lens and camera can cover, check out this handy FOV calculator: https://www.pointsinfocus.com/tools/depth-of-field-and-equivalent-lens-calculator
To change the date and time move your mouse back to the lower left side again to make the options menu pop out or hit F5 on your keyboard. Now you can change the time and date. By default Stellarium displays the sky in real time mode like a movie. To pause the display and look at specific times and dates, hover over the display text at the bottom of the screen near the left to make another options menu popup. Click the play button to pause the display. Have a look at the other display options here while you’re at it. Stellarium can display meteor showers, planets, Zodiac figures and names, two different coordinate grids, and more.
This Stellarium landscape shows the view from the bench at the center of the park’s pavilion. The next time I get a chance and the weather is right, I may be able to do another custom panoramic landscape from out in the observation field and add that to this post.
If you have any problems with the landscape, you can contact me via the Contact page on this site. If you have questions about using Stellarium then their user guide can provide more help: Stellarium User Guide.
When Can I Photograph The Milky Way?
Below is a list of approximate dates and times when, if the weather is clear, the Milky Way will be the most visible this year at John Glenn Astronomy park and the around the rest of Ohio. The Milky Way may be partially washed out during part of these time frames depending on when the moon sets, but I wanted to give you the maximum number of opportunities to find a clear night. I hope this gets you inspired and prepared to get out there and create your own Milky Way photos. You’ll be able to find my Milky Ways photos on my Instagram: @sherrill_photo.
- March 5-9 4am to 5:30am
- March 10th Daylight Savings Time Begins
- March 10-15 5am to 6:30am
- April 1-10 2:30am to 5:30am
- May 1-15 1am to 5am
- June 1-13 Midnight to 4am
- June 27 – July 10 11pm to 4am *Galactic core gets highest in the sky for the year during these dates around 12-12:30am
- July 26 – August 4 10:30pm – 1am
- August 25 – September 4 10pm to 1am
- October: The galactic core does not rise above the tree line at the Astro Park. In other areas with a high elevation and clear horizon,you may be able to see the core briefly from September 21-30 9:30pm to 11pm