In this second part in my series I’m sharing some tips and techniques to improve your winter nature photography. In Part One I went over some safety and gear ideas. If you haven’t read that one yet, check it out then come back. If you’re interested in purchasing any of the gear I mention, please consider using the product image links below. They are Amazon affiliate links – they don’t cost you a penny, but help support this site.
Meter, meter, brightness eater
A light meter is the thing in your digital camera that lets it determine the brightness or darkness of the stuff you’re photographing. With this information it can change aperture, ISO, and shutter time to get a properly exposed photo. OK, but what is “properly exposed”? Isn’t that a a bit subjective?
Yes. It should be subjective. It should be how you, the photographer, see or even feel about the scene you’re capturing. A “proper exposure” should emphasize the details you want to showcase. Do you want to capture the details in the shadows or the highlights? Is the mood you want to convey bright or dark?
Your camera doesn’t create art any more than a paintbrush, you do.
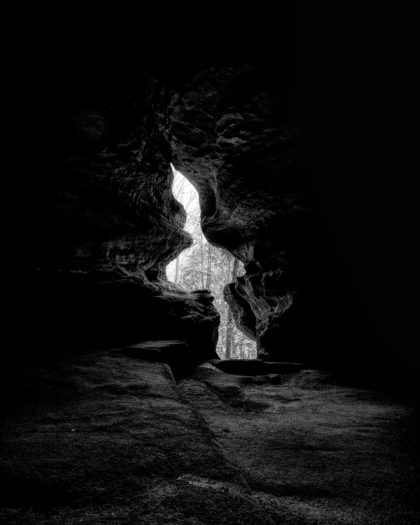
The two cave photos below were taken from the same spot on the same morning. The one on the left was metered for shadow detail to make the space look bright and inviting. The one on the right was metered for highlight detail which makes the space seem closed off and intimidating.

Real quick, there are two kinds of light meters – incident and reflected. An incident meter is one of those weird little boxes with a white dome that portrait photographers hold up to the faces of models. They directly read the amount of light falling on a subject from the source. This is the better way to get the most accurate exposure. The meter in your camera can only measure the light reflected off the stuff you’re photographing and make a guess about how much light is really falling on the scene.

The problem with that is real world objects vary enormously in their reflectivity. The camera is going to think there’s a lot more light in a scene if you meter off a shiny car than if you measure the dull pavement. In that scenario, the car may be exposed well, but the pavement will be under exposed and will lose all detail.
To get around this problem, reflected meters are standardized. They assume that whatever you’re pointing it at has the reflectance of 18% gray. If it isn’t a uniform 18% gray, then it’s up to you make the adjustments.
If you leave your camera in auto mode and try to photograph a scene with a lot of snow, you’ll have two problems. The first is the 18% gray thing. The camera is going to underexpose and turn the snow gray. You can correct for this in a few ways. The easy way is to set your camera to take a bracket of three to five exposures and then just use the shot the camera thinks is overexposed.
Exposure Compensation
No, I’m not talking about some cheap schmuck demanding you do photography work and be “paid” with exposure.
 Exposure Compensation is a tool for more precision in shooting winter scenes. I shoot in Aperture Priority mode most of the time and use Exposure Compensation on nearly every shot I take year round. In A mode you select the lens aperture, i.e. f/8, and ISO you want to use and the camera selects the shutter speed based on its meter reading. EC (EV on some cameras) lets you override the camera’s guess at the proper exposure.
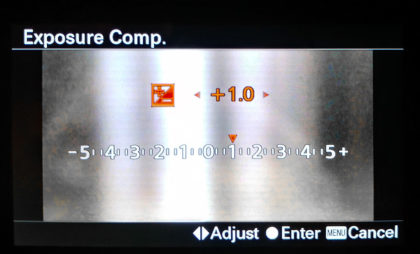
For snow you want to increase the EC to compensate for the camera making the snow too dark. Increasing the EC to +1 doubles the lightness of the snow. Increasing the EC to +2 quadruples it, doubles then doubles again. Doubling and quadrupling sounds like a lot, but a stop or two, depending on what else is in your scene, will be just enough to whiten the snow and capture more details in darker things like trees or water.
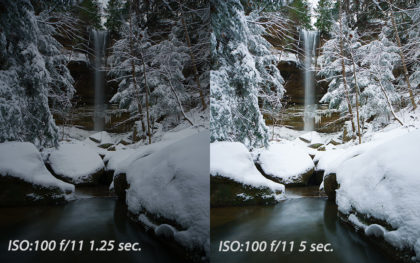
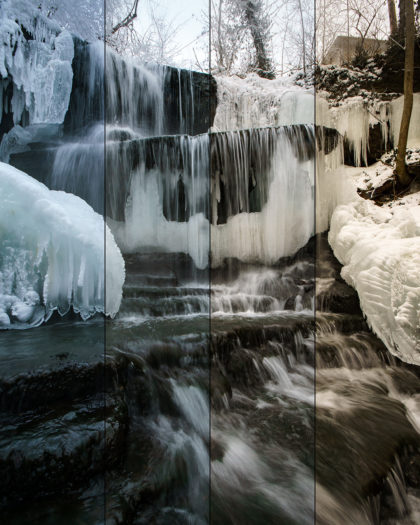
In the shots below, the one on the left is the exposure the camera chose and the one on the right is the shot with the EC set to +2.
If you’re in A mode and shooting handheld instead of on a tripod, keep an eye on the shutter speed when you increase the EC. Doubling or quadrupling the exposure can give you a speed that’s too slow for a handheld shot. The rule of thumb for shooting handheld is a shutter speed of 1 over double your focal length – i.e. with a 50mm lens you want at least 1/2×50 or 1/100 second. If you increase EC and your shutter speed is too slow for handheld then you’ll have to increase the ISO, use a larger lens aperture (smaller f-stop number), or use a tripod.
Going Au Manuel
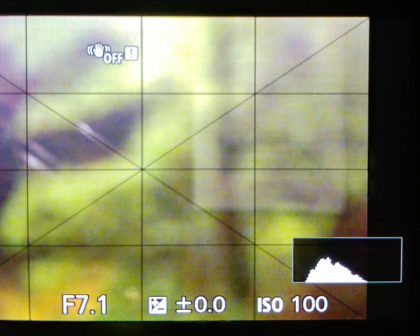 For the most control over your winter scene you can shoot in Manual mode and select the aperture, ISO, and shutter speed. If your camera can show a live histogram on the LCD, you can use it to help get the exposure you want without overexposing the snow and losing all detail. As long as the little mountain in the graph doesn’t touch the right side of the box, you’re not over exposing. If there is a very bright sky in your scene, it may be harder to get the snow white without blowing out the sky.
In that case you may need to shoot an exposure bracket or just one extra shot with EC set back to 0. Then you can combine the two exposures in editing to recover some sky detail.
Watch out where the huskies go…
The second problem you may have in Auto mode is the White Balance. What’s worse than gray snow? Yep, …don’t you shoot that yellow snow. If you shoot in RAW (and you should) then you can solve the problem in editing, but I prefer seeing the scene as close as possible to its final version as I’m composing. Yellow snow.. er, let’s say orange snow instead, could certainly be a creative choice in some circumstances, like a sidewalk lined with winter luminaries. Most of the time though, viewers will expect snow and ice to be white or even a little blue.
If you photograph a white coffee cup that is lit by a candle it will appear orange. By applying a blue cast to the photo in editing, you can balance out the orange candle light and make the cup appear white again. That, in a nutshell, is the color temperature part of White Balance.
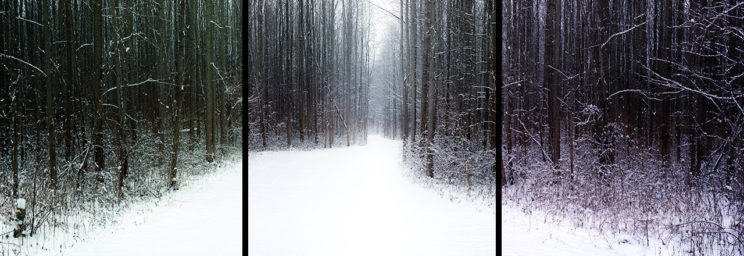
Below is the same photo with four different white balance settings. From left to right they are, ‘Tungsten’, a custom WB (more on that in a minute), the camera’s Auto WB, and last, Lightroom’s Auto WB. I include Lightroom’s attempt as a cautionary example; don’t assume you can just have your editing software correct things automatically. In this case, Lightroom’s guess is the worst of all.
The other component of White Balance is the photo’s tint towards either green or magenta. In photos of ice and snow this is usually left neutral, but you can apply a tint for creative effect. The effects of tint are subjective, but in general green will tend to give winter images a bleaker, tense vibe and magenta makes them more dreamy and relaxed.


You can also just use the snow itself. With the camera in ‘Set Custom White Balance’ mode, fill the on-screen circle with snow (out of focus is fine) and hit the button. Again, the camera will set the color temperature and tint based on the snow. If you do set a custom white balance, remember to reset the camera back to ‘Daylight’ or whatever you generally use.
To Be Continued
In the third part of this winter nature photography series I’ll be sharing some ideas for what to shoot in the winter and some specific tips and instructions for each subject. So check back soon and thanks so much for visiting!
